HOW TO GET A
LIGHTMAPPED STATIC PROP INTO GRAW
Hello again folks and welcome to the step by step tutorial on how to get
a lightmapped static prop into GRAW to make your maps just a tiny bit sweeter!
In writing this I have already assumed that you have SOME knowledge
about computers, masterfull skills in 3dsmax and equal skill in your
prefereredd image editing package.
AND that you have already unbundled GRAW and are ready to go on a wild ride in the jungles of game editing. Oh my I'm just getting worse by the minute..
0.5 DO THIS FIRST TEH PLZ -THE IMPORTANT
Copy the "data" folder from the tutorial folder right on top of your data folder in your unbundeled game. That will create all the files that I will talk about in the tutorial
Copy the "my_textures" folder from the tutorial folder to your c:\ or whatever root you please, but the tutorial is written for c:\ so you'll have to adapt but im sure you'll manage that;)
1.
What do you need?
-
A copy of the much popular 3d package Autodesk 3dsmax
7 (can be bought at www.autodesk.com where they have student versions at “reasonable”
prices). I'm sure you wont have any problems obtaining this software.
-
Adobe photoshop or something similar , there are free
options such as http://www.gimp.org/, bah,
you probably have that sorted already
-
Some kind of text editor with xml support, something
like Ultraedit should do the trick. However, Notepad DOES work but I wouldn't
recommend using it..
-
The 3dsmax diesel exporter that comes with GRAW patch1.16
-
Atlasgen.exe that comes with GRAW patch1.16. It can be
found in the “tools” directory in the games root folder.
-
A little bit of patience
-
Oh and I almost forgot.. you also need a retail copy
of GRAW, you havent pirated it have you? Bad boy.ah well, lets get started.
2.
Humble beginnings
copy the the maxexporter.dle file into your 3dsmax7 plugins directory.
Then startup 3dsmax.
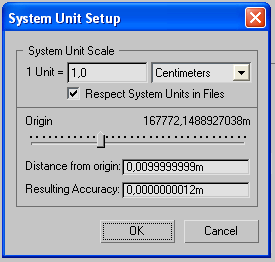
The first thing you should do is to go up to the “customize” menu, choose
“units setup”, press “system units setup” and change the settings until it
looks like this:

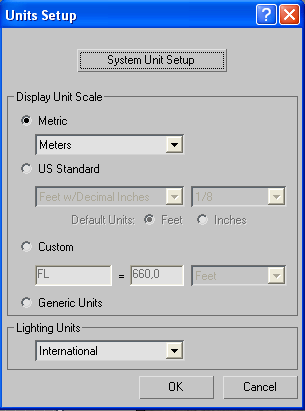
Then you press “ok”
and change the “units setup” window until it looks like this!

great! Now press ok and we are ready go continue with the actual fun stuff.