HOW TO GET A
TERRAIN INTO GRAW
Description:
In this tutorial you will learn how to export a landscape mesh to the diesel
engine.
This is an advanced tutorial that will aid you with reference when creating new
content for graw
and not a step-by-step instruction.
What you will need:
Ghost Recon Advanced Warfighter with patch 1.16 or later.
3D Studio Max 7 with the dieselexporter installed.
Nemons bundle extractor
Contents:
tutorial.txt - This file.
Landscape_tutorial_max7.max - Maxfile containing the mesh
data\levels\custom_levels\your_level\texture_scope.xml - Texture scope for the
level
data\objects\city\custom_level\custom_level_landscape.xml - Model file
data\objects\city\custom_level\materials.xml - Material file
data\units\city\u_custom_level.xml - Units file
General workflow
This is a short summary of the workflow that this tutorial covers.
We begin in 3d studio max, here we sculpt the landscape to it's desired shape
and leave holes
for buildings that you want to add inside the editor. Then we texture the
landscape and add a vertex
color channel to blend between different textures. When this is done we add
ambient points to provide
accurate lighting of all dynamic objects in the game. Then the landscape is
ready for export.
Once exported we set up a xml and materials file for the editor, we add the
object in a new units file
and lastly add the textures to the level. Afterwards we include all these files
in the level bundle.
Ok. Lets get to work.
The first thing you should do if you haven't done it yet is to unbundle the
whole game (bundles\quick.bundle)
with Nemons extractor, this way you reach the textures inside 3d studio and have
a look at other landscapes.
This is not completely necessary for this tutorial, but is recommended.
Inside 3d studio.
Load up 3dsmax 7 and open Landscape_tutorial_max7.max. It contains the root
point, the landscape
(gg_mp_land), a backdrop to the landscape (gg_mp_landscape_01_backdrop) and 155
ambient points. The file
and the editor works in metric scale so set your system units to meters.
The root point.
The root point is the main node in any scene for graw. Nearly always should all
nodes have this node
as its parent. In static meshes such as these it's ususally placed on 2,5m to
2,5 m, this is so that the root
point will be placed in the center of a square in the 5*5 m grid that is used in
the editor.
Modelling:
What you should keep in mind when creating a landscape is that any face of the
surface that has more
than 30 degrees (default value) of elevation will be impassible. Try to avoid
very steep slopes if you
want the player to be able to walk upon them. If you plan to add some buildings
into the landscape you must
plan ahead for this and create holes in the gound. Most buildings are built in a
5*5 m grid so leaving holes of
10*10, 10*20 and 20*20 m and such is a good start. You can use the editor to
calculate the exact dimensions of
a particular building you wish to use.
The backdrop is just another landscape which provide a further silhouette
outside the landscape.
Texturing:
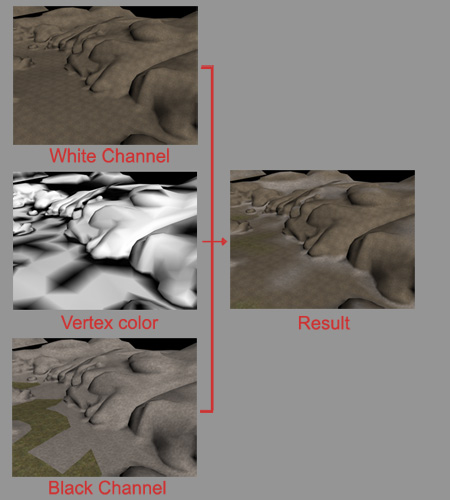
the textures used for landscapes are tiling in both directions so you can tile
them any way you want. If you add
a VetexPaint modifier to the landscape you will see that it's colored in black
and white. This is done to blend
different textures together.
There are three materials blending in this example. They are named cliff_mud,
dirt_mud and dirt_grass in the material editor.
If we have a look at data\objects\city\custom_level\materials.xml we will find
how these materials are defined
ex:
<material name="dirt_mud" src="landscape" decal_material="dirt">
<diffuse_texture file="gg_dried_mud_xy_df"/>
<bump_normal_texture file="gg_dried_mud_xy_bm"/>
<self_illumination_texture file="gg_dirt_xy_df"/>
<distorsion_texture file="gg_dirt_xy_bm"/> (no typo, just swedish)
</material>
The first two maps (the bump and diffuse texture) are parts of hte first
component of the blending texture,
the second two is the other component. If the vertex color is white, the first
component will be used and
the more black the vertex color gets the more the other texture will be seen.
note: never mind the names of the textures (self illumination and distorsion), they are diffuse and
normal textures, they are just need to be mapped like that in theis special shader
ex:
<material name="cliff_mud" src="landscape" decal_material="dirt">
<diffuse_texture file="gg_dried_mud_xy_df"/>
<bump_normal_texture file="gg_dried_mud_xy_bm"/>
<self_illumination_texture file="gg_rock_xy_df"/>
<distorsion_texture file="gg_rock_xy_bm"/>
</material>
As you can see, dired mud is used as the first two maps in both dirt_mud and
cliff_mud is gg_dried_mud_xy.
What this means is that if you paint 100% white in the seam between these
textures the textures will fully blend
and the seam wont be noticed.
the textures in our examples blend in this manner:
cliff_mud <-> dirt_mud <-> dirt_grass
With some creativity you can create mud paths thorugh a grass patch, or rocky
parts in a muddy area. You can also
set up new materials, and create new textures and blend them in any way
imaginable.

Optional: Previewing the textures inside of 3d studio max.
To see the textures in this example go to:
data\textures\atlas_world\atlas_ground_ghetto_mission08_remade\
in the subfolders you will find
atlas_gg_m08_remade_dried_mud_diffuse\atlas.dds
atlas_gg_m08_remade_dirt_diffuse\atlas.dds
atlas_gg_m08_remade_rock_diffuse\atlas.dds
atlas_gg_m08_remade_grass_diffuse\atlas.dds
These are the textures used. They can be seen inside 3d studio max, and rendered
inside the program
correctly by using a mix-map with the two maps specified in the materials file
as color#1 and color#2 and
with a vertex color map as the mix amount map. However this is only for a
preview inside max and is not needed.
Lightmaps
To create a lightmap you need to map up the object using map channel 4. To do
this add a Unwrap UVW modiifer
and set map channel to 4.
Some guidelines for lightmapping is that you may not have overlapping faces, and
the map must be within
0 to 1 in the uv space. Also scale the map in a few pixels so that you make sure
the will be no bleeding
from the other side of the landscape. A good start is to map it planar form the
top and relax it a bit.
Ambient points
These dummys are all linked to the root point and provides all dynamic objects
such as player models
with acurate lighting from the lightmaps. Put them out dense where you think
there will be contrasts
in the lightmaps (shadows/direct sunlight) and up to 1 at each 15*15 m for wide
open areas where the
lighting doesn't change much. Ususally they are placed 1 m above the surface of
the landscape.
The ambient points must be named exactly "ambient01", "ambient02" to work
properly!
Now we are ready to export the file into a .diesel object. But don't do that
just yet. To use the
exporters internal optimization for the diesel engine you will need to have a
materials.xml first.
Also it's often a good idea to set up your model.xml first.
Model.xml
Ok, now under data/objects/city/custom_level/ create materials.xml and
Custom_level_landscape.xml
Both these files are supplied.
Custom_level_landscape.xml
<?xml version="1.0" encoding="iso-8859-1"?>
<dynamic_object xmlns:xi="x">
<diesel file="/data/objects/city/custom_level/custom_landscape.diesel"
orientation_object="root_point"
materials="/data/objects/city/custom_level/materials.xml" viewports="default|crosscom"/>
The location of your diesel file, the materials.xml file and what the
orientation object is named (the root point).
viewports="default|crosscom" is only for single player.
<body fixed="true" name="gg_mp_landscape_01" template="static_ground"
max_walk_angle="30">
<object name="root_point"/>
<object name="gg_mp_landscape_01" collision_type="mesh_mopp" hidden="false"
material="concrete"/>
<object name="gg_mp_landscape_01_backdrop" collision_type="mesh_mopp" hidden="false"
material="concrete"/>
</body>
Bodies are groups of objects that have a collision. more on this in the coming
indepth model.xml tutorial
body fixed="true" - This body does not move.
name="gg_mp_landscape_01" - The name of the body
template="static_ground" - A template to provide default values
max_walk_angle="30" - This is a variable that defines how steep a slope has to
be for the
player not being able to move across the face. Setting it higher will allow
the player to climb steeper slopes. Be careful with this setting. It may give
odd results and allow players to get outside the playable area.
<editor_marker_manager>
<marker name="gg_mp_landscape_01">
<offset x="0" y="0"/>
</marker>
</editor_marker_manager>
You must have a editor_marker_manager in every static object or the editor will
crash when trying to spawn the object.
This landscape has only one marker, set at 0,0.
This is because the area inside markers is considered to be occupied by the
editor and we want to be
able to spawn buildings inside the landscape. Othewise we would set four
markers, one in each corner
of the landscape. The offset is in the 5,5 m grid that the editor uses for
static units.
<decal_surfaces static="true">
<ds_mesh object="gg_mp_landscape_01"/>
<ds_mesh object="gg_mp_landscape_01_backdrop"/>
</decal_surfaces>
This tag specifies tells the engine that gg_mp_landscape_01 and
gg_mp_landscape_01_backdrop will both spawn
decals and hit effects when hit by bullets. The decal used is set inside the
materials.xml
<lightmap>
<object name="gg_mp_landscape_01" height="1024" width="1024"/>
<object name="gg_mp_landscape_01_backdrop" height="512" width="512"/>
</lightmap>
Finally we add lightmap tags to gg_mp_landscape_01 and
gg_mp_landscape_01_backdrop so that they recieves lightmaps
when exported, height and width is their size in pixels.
</dynamic_object>
Materials.xml
We have already been into this file when we looked at texturing. But here is some info additional information
about the material
<material name="dirt_mud" src="landscape" decal_material="dirt">
<diffuse_texture file="gg_dried_mud_xy_df"/>
<bump_normal_texture file="gg_dried_mud_xy_bm"/>
<self_illumination_texture file="gg_dirt_xy_df"/>
<distorsion_texture file="gg_dirt_xy_bm"/>
</material>
name="dirt_mud" - This is the name of the material in 3ds max
src="landscape" - The name of the shader applied, the vertex color blending landscape shader
decal_material="dirt"> - Assigns what hit effects are played when bullets hit this material
For further reference look at the tutorial about creating a object.
Setting up the unit file.
When we are done with the models file and material file we need to tell the
engine and editor
where to find these files. This is done by going into
data\units\city\
and add u_custom_level.xml (supplied)
ex:
<unit type="static" name="ghe_custom_landscape_01" slot="35">
<model file="/city/custom_level/custom_level_landscape.xml"/>
<script_class name="base" class="Base"/>
<script_class name="editor" class="Editor"/>
<stats block="base_data">
<var name="lightmap" value="true"/>
<var name="no_silhouette" value="true"/>
<var name="ambient_points" value="155"/>
</stats>
</unit>
<unit type="static" name="ghe_custom_landscape_01" slot="35">
This means that it will show up in the static layer in the editor with the name
"ghe_custom_landscape_01".
The prefix ghe_ is to assign it to the shanty set.
ghe_ is shanty (ghetto) set
his_ is historical set
ind_ is industrial set
cen_ is centre set
Slot 35 is a landscape slot.
<model file="/city/custom_level/custom_level_landscape.xml"/>
This is where the model file is located under data/objects/
<script_class name="editor" class="Editor"/>
This is the editor markers, this tag must be a part of every static unit.
<var name="lightmap" value="true"/>
A tag that says that this unit should generate and load lightmaps.
<var name="no_silhouette" value="true"/>
This tag tells the engine that the mesh should never swap into a silhouette,
this is by deafult
off for all units but for landscape it should be set to "true".
<var name="ambient_points" value="155"/>
A variable that says that this unit contains ambient points and the number is
how many.
Creating a level with your new object.
Once this file is created inside the data\units folder the editor will
automaticly read it and through it
find your landscape. Now jsut load up the editor in the shanty set and if you have done everything
correctly you will now be able
to select ghe_custom_landscape_01 from the static layer and spawn it.
Once you are satisfied with your level and exported it to a bundle there are
some things you need to do to
add the object into the level bundle.
Adding the files into the bundle:
First you need to copy all the files you have just created into the patch, so
unpack the bundle and remember
to keep the same catalouge structure.
What you also need to do is altering the texture scope so that the game loads
the used textures, go to
data\levels\custom_levels\[your_level]\texture_scope.xml
and add these lines within the <scope> and </scope>
<texture_set name="atlas_world/atlas_ground_ghetto_mission04_remade/atlas_gg_m04_remade_dirt_diffuse"
/>
<texture_set name="atlas_world/atlas_ground_ghetto_mission04_remade/atlas_gg_m04_remade_dirt_bump"
/>
<texture_set name="atlas_world/atlas_ground_ghetto_mission04_remade/atlas_gg_m04_remade_dried_mud_diffuse"
/>
<texture_set name="atlas_world/atlas_ground_ghetto_mission04_remade/atlas_gg_m04_remade_dried_mud_bump"
/>
<texture_set name="atlas_world/atlas_ground_ghetto_mission04_remade/atlas_gg_m04_remade_rock_diffuse"
/>
<texture_set name="atlas_world/atlas_ground_ghetto_mission04_remade/atlas_gg_m04_remade_rock_bump"
/>
<texture_set name="atlas_world/atlas_ground_ghetto_mission08_remade/atlas_gg_m08_remade_grass_diffuse"
/>
<texture_set name="atlas_world/atlas_ground_ghetto_mission08_remade/atlas_gg_m08_remade_grass_bump"
/>
Save the file and repack the bundle again.
Then put it in your graw/custom_levels and try out a level with your own
landscape in it!
